Friday, December 31, 2010

Binary and Xml Serializable Dictionary

You can also see my codeproject article Both Xml and Binary Serializable Dictionary
I had a project where I needed to use binary serialization for deep copy and also needed Xml serialization for saving these into database.
Dictionary class is not by default xml serializable. For making it serializable we  need to implement a derived class implement interface IXmlSerializable. Also to get all functionality of Dictionary I have implemented that class from Dictionary class. The key type of Dictionary is string as I needed so I make it string for simplicity.
[XmlRoot("Dictionary")]
public class SerializableDictionary<VT>:Dictionary<string,VT>,IXmlSerializable


IXmlSerializable class contains following method that we needed to implement in our class


public interface IXmlSerializable
{
XmlSchema GetSchema();
void ReadXml(XmlReader reader);
void WriteXml(XmlWriter writer);
}   


But we also have to make our dictionary binary serializable. For serialization we need to set serializable attribute over our derived class. However when we try to deserialize our derived class in raise error saying there is no appropriate contractor to deserialize our class though default constructor exist. Dictionary<> class implements its own custom serialization using ISerializable so our derived class need special constructor for deserialization


public SerializableDictionary(SerializationInfo info, StreamingContext context):base(info,context)
        { 
        }


So the implementation of SeriliazableDictionary<T> which can be serializable as Xml and also in binary formate is given bellow.


[Serializable]
[XmlRoot("Dictionary")]


public class SerializableDictionary<VT>: Dictionary<string,VT>,IXmlSerializable
{ 
public SerializableDictionary( SerializationInfo info, StreamingContext context):base(info,context){} public SerializableDictionary(){} public XmlSchema GetSchema(){         return (null);       }
   public void ReadXml(XmlReader reader)    {      Boolean wasEmpty = reader.IsEmptyElement;      reader.Read();      if (wasEmpty)       {          return;       }      while (reader.NodeType!= XmlNodeType.EndElement)       {          if (reader.Name == "Item")           {            String key = reader.GetAttribute("Key");            Type type = Type.GetType(reader.GetAttribute("TypeName"));            reader.Read();            if (type != null)            {              Add(key, (VT)new XmlSerializer(type).Deserialize(reader));            }            else            {              reader.Skip();            }            reader.ReadEndElement();            reader.MoveToContent();           }        }        reader.ReadEndElement();   }   public void WriteXml(XmlWriter writer)   {    for (int i=0;i<Keys.Count;i++)    {      string key =Keys.ElementAt(i);      VT value= this.ElementAt(i).Value;      writer.WriteStartElement("Item");      writer.WriteAttributeString("Key", key);      writer.WriteAttributeString(string.Empty,"TypeName",string.Empty, value.GetType().AssemblyQualifiedName);      new XmlSerializer(value.GetType()).Serialize(writer, value);      writer.WriteEndElement();    }   } }

.NET Utility class for getting application name of a site


In our application we needed to find out application name of a site for routing. One solution for finding out application name from URL using regular expression. but VirtualPathUtility class of .NET make it easy to get application name by using relative path. VirtualPathUtility class provides utlity methos for common operations involving virtual paths. We do not know with which name our application would be deployed. so for constructing URL we use ‘~’ for relative path. So VirtualPathUtility.ToAbsolute(“~”) give me the absolute path ‘/Website’ were my website URL is http://localhost/Website. Also for getting relative path of a resource from a user control of a site you can use VirtualPathUtility.MakeRelative(Request.Path, "~/scripts/jquery-1.4.1.js");

Friday, October 22, 2010

Work Flow of Build Automation

You can also see my code project article Work Flow of Build Automation
Every solution has own set of configuration. So operations needed to do for automated build system depend on project. Here I have suggested effective workflow and operations which is same for every project.
Cruise control is a fantastic tool with which you can automate your build and implement continuous integration in your team very easily. It is also very easy to integrate other service output Unit test, NCover result to improve build process and ensure good and deployment product.
In team environment we need to ensure my code that I checked in source control do not break build and also have to ensure that my code is also deployable.To ensure that what we have checked in do not break build, we can build solution by build automation tools after every check in or can do pre-commited build ( teamcity CI tool) which ensure last checked in code is secured for team development. After successful build we can created setup file or deployable output but it not needed after every commit which increase our automated process time . But to ensure deployable output/setup file is also safe we can automatically create setup file by doing nightly build. We can do easily by cruise control <triggers> options.
CCNetTrigger
Here after 60 seconds CCNet trigger to check any new code is committed in SVN . If it find any latest commit by developer then it run NAnt script. Ant with schedule trigger it run Nant at 6am with force build which does not depends on any lealest code is committed in SVN or not. If you want you create Setup file/deployable output when Force buid condition is true otherwise only rebuild solution then you can create an target in CCNet which make this decision according to your BuildCondition .
NANTRun
Here in this target (Run) which calls other two target '”OnlyRebuild” and “RebuildAndCreateSetup” target. When you press ‘Force Build” button of CCNet or with BuildCondition =”ForceBuild”  it will call target “RebuildAndCreateSetup” otherwise for formal check in of source code it will run OnlyRebuild to ensure your source code is always deployable.
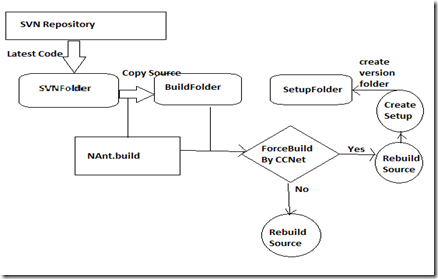
Cruise control triggers (<intervalTrigger seconds="60"/>) after certain time to check anything is checked into source control or with force build and start build process. In my project our source control is maintain by our client which we access through internet. If we try to checkout whole solution after every check in for build then take much time but we only need to merge last checked in files. So we create a folder say SVNFOLDER where we checkout whole solution one time and after that every time cruise control only update with latest files but we will not build solution in that checkout location for ensuring our code do not conflict anytime when taking latest changes by cruise control. We create another folder say BUILDFOLDER where we copy fresh code from SVNFOLDER and perform all operations to build solutions. These operations I have done using NAnt. After updating lasted code cruise control call NAnt script as defined in config file. 
NAnt Operation can be described by following steps
1. Copy whole source from SNVFolder to BuildFolder
2. Get then SVN Revision Number and CCNet level for creating version number. version number as <CCNetLevel>.<SVN Revision>
3. Change GlobalAssembly.cs with version number and other settings and also change web.conf with release configuration.
4. Run MSBuild with all configuration to rebuild solution.
5. Run Unit Test  if your project contains Unit Test.
6. Run NCoverage  (optional)
7. You can also run FxCop and other tools for analyzing your build. This step is also optional.
8. Create Setup file or other deployable output.
9. Copy the deployable output into SetupFolder  with version number.
When ForceBuild is clicked from CCNET or when BuildCondition = “ForceBuild”  then it do all operations as mentioned above  from 1 to 9. And for regular source code check by developer NAnt only perform step 1 to 7 to ensure developer last checkin  is safe to create deployable output.

The work flow of CCNET is given here

NANTBuild

Sunday, October 17, 2010

Automating Web Application Deployment .NET v4.0 and MS Deploy

You can also see my code project article Automate Publishing a WebSite into IIS using MSDeploy and NAnt Scripts
I was searching a way to automate publishing my website in staging server. In .NET v4.0 it become very easy to deploy my site in IIS v7 to v5 using msdeploy.exe.
In installation of VS2010 also install MS Deploy in your machine in x:\Program Files\IIS\Microsoft Web Deploy folder. And For deploying WebApplication from VS 2010 it give window like this.
clip_image002
It allows you deploy a web application not only in your IIS but also in remote server. This use web deployment tool (Msdeploy.exe) internally.
you will get major features of Web Deployment in VS 2010 here. http://blogs.msdn.com/b/webdevtools/archive/2009/02/04/web-deployment-with-vs-2010-and-iis.aspx
New command is found /target:package with MSBUILD in .NET v4.0 framework. This create an .zip file with all IIS settings, Web Content , SQL Server DB scripts , and other various artifacts like Security Certificates , GAC components, Registry etc.
The command for creating package of web application project WebApp.csproj is . 
C:\..\MSBuild.exe X:\WebApp.csproj /target:Package
It will create .zip file according to configuration.. as configuration is Debug so it create Package folder under debug. but you can specify your build configuration and set the location of package

C:\..\MSBuild.exe X:\WebApp.csproj /t:Package /p:Configuration=Release /p:PackageLocation=x:\WepApp\WebApp.zip


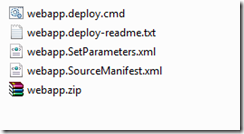
It creates following files  under x:\WebApp after executing this command. you can see there it contains command file, readme text for helping you to run command file and another xml let you to configure your deployment and manifest file.


Untitled


Now lets see what readme.txt contains. it tell you how to run webapp.deploy.cmd and also to customize your IIS parameters you can change webapp.SetParameters.xml file.  this command file actually run msdeploy.exe  with some commands. The options are given in this txt file. so I am not describing  those options here.

Let see the webApp.SetParameters.xml file. It give you options to change  your web Application name in IIS and also allow you to change your database connection string . I have created an web application “WebApp” under “default web site” site. So I can Set “IIS Web Application Name” as “Default Web Site/WebApp”.Untitled

IIS 7  gives you options to import webapp.zip file with Import WebApplication wizard. For automation you can run web.app.deploy.cmd file.

Now lets run the webapp.deploy.cmd file with the command which allows you to deploy your web application .zip file in local or remote machine.

First see the command for deploying webapp.zip in local machine. but for that you have to create web application in IIS given in webapp.SetParameters.xml file. You can also create Web Application in IIS with msdeploy.exe commands.


Now run this command file from command prompt. you can give /T command as instructed in readme file which not deploy but give you simulation of deployment. but for deploying your web application you use /Y command.


C:\..\webapp.deploy.cmd /Y

You can also deploy your web application in remote server. but for that your remote service should be run in your remote server so that it allowed remote connection. msdeploy use remote connection to deploy your web application. you can install your web appliction in buildserver machine with following command as given in readme file.


C:\..\webapp.deploy.cmd /Y /M:192.168.1.12 /U:milton /P:xxx
But for deploying in remote machine you need to have web deployment agent service on in that machine. And for that you need to install web deployment agent service feature of web deployment tool http://www.iis.net/download/webdeploy . After installing you need to run service. You can check your web deployment agent service agent is running in that machine by http://localhost:80/msdeployagentservice.

The main goal of this article to give you way to automate web application deployment in  IIS 5 to IIS 7 using command. You can integrate into NANT or MSBuild scripts to automate build.

Tuesday, April 6, 2010

Combine multiple css files into one file and minify css and javacript using NAnt

You can also see my code project article Combine Multiple css Files into One File and Minify css and javascipt using Nant
When you use multiple css files in project , for each css file it makes extra HTTP request to server. Even though you use ASP.NET theme it breaks out into multiple css files. Also if you minimize the size of css files then your page will load faster.
In development time you might want to organize css into multiple files and with proper whitespace and comments. But you should keep in mind that Internet Explorer 6, 7 do not support more than 31 css files in a single page. In case of deployment you can combine multiple css files into single css file and also minimize size of file using minifier like YUI compressor for loading your page faster.
ASP.NET theme is used in our application so if I replace multiple css files into one css it does not affect application wide. You can also combine javascript files into one file. But in our application javascript files have direct references in user controls so I have only minified javascripts files in deployment. You can combine multiple javascript files into one using composite script references the Script Manager Combining Client Scripts into a Composite Script. Here I will discussion only deployment time process which help to load your page faster.
For automating all these process I used NAnt tool. Combining multiple files into one file is easy in NAnt using task. Also for minifying css and javascript files I used YUI compressor.
First I discuss process steps before going to example:
  • combine all css files into one files. NAnt give you a easy way to do this using task.
  • After combining multiple css files and javascript files are minified using YUI compressor. YUI compressor safely minimizes your css and javacript file size.
  • Add created single css file in project and remove other unused css files from project reference. So that It does not break your setup and after deployment you get only one compressed css files.
Here I have given code block which combine multiple css files into single style.css files and delete other css files from Theme folder.
you need to have NAnt contrib dll registered or you can add <loadtasks assembly="${NAntContrib}\NAnt.Contrib.Tasks.dll" />.


<target name="css" description="Concatenate CSS source files">
<loadtasks assembly="${NAntContrib}\NAnt.Contrib.Tasks.dll" />
<echo message="Building ${BuildDir}\${CssFileLocation}\style.css" />
<concat destfile="${BuildDir}\${CssFileLocation}\style.css" append="true">
<fileset>
<include name="${BuildDir}\${CssFileLocation}\*.css" />
</fileset>
</concat>
<echo message="${BuildDir}\${CssFileLocation}\style.css built." />
<echo message="delete other files except style.css" />
<delete>
<fileset>
<include name="${BuildDir}\${CssFileLocation}\*.css"/>
<exclude name="${BuildDir}\${CssFileLocation}\style.css"/>
</fileset>
</delete>
<echo message="delete other files except style.css is done" />

</target>

For minimizing the size of css files and javascipts files I used YUI compressor. The article YUI Compressor and NAnt have nice script for minifying css and javascript using Nant.

I have removed css files from theme folder but references of these files exist in my web project. In NAnt I run a C# code block which work before I build my solution. This code first finds all references of css files in web project and then removes these references and also adds new style.css reference.


<target name="ReplaceCss">
<property name="filename" value="${BuildDir}\${WebProjectPath}" />
<script language="C#">
<code>
<![CDATA[

public static void ScriptMain(Project project)
{
StreamReader projectFileReader = new StreamReader(project.Properties["filename"]);

string replacement =  @"<Content Include=\""App_Themes\\ABC\\[\w-]+.css\"" />";
string fileversionreplacement = @"<Content Include='App_Themes\ABC\style.css'/>";   
string x = @"<Content Include=\""App_Themes\\ABC\\[\w-]+.css\"" />";          
string output = @"<Content Include='App_Themes\ABC\style.css'/>";
Regex sourcePathRegx = new Regex(x);
string projectFile;
try
{
projectFile = projectFileReader.ReadToEnd();
}
finally
{
projectFileReader.Close();
}
MatchCollection match = sourcePathRegx.Matches(projectFile);
if(match.Count>0)
{
int i = 0;
foreach (Match collection in match)
{
if(i==0)
{
projectFile = projectFile.Replace(collection.Value, output);
}
else
{
projectFile = projectFile.Replace(collection.Value, string.Empty);
}
i++;
}                
}
StreamWriter projectFileWriter = new StreamWriter(project.Properties["filename"]);
try
{
projectFileWriter.Write(projectFile);
}
finally
{
projectFileWriter.Close();
}   
}
]]>
</code>
</script>
</target>


Another approach you can use in setup project by adding Exclude Filter where you can exclude redundant css files but for this you need to add style.css file in your web project.